Applies to Visual Studio, Tool-Making
Requirements: Visual Studio, ConvertForm (Module)
Introduction
This is part 2 of the tutorial- if you haven’t read part 1, you can do so here.
In the last post, we covered creating a GUI in Visual Studio, converting that to a .ps1 PowerShell script, and working with a few of the controls on the form. In this article I’d like to get more into the tool-making aspect of GUI development to help add real value to the applications you make.
One of the main reasons for creating a GUI instead of a regular script or module is to simplify the user input. We’re going to start with fields, how to utilize that data, as well as displaying and manipulating data in the DataGridView format. We’re going to need to edit our Visual Studio design form to add these new controls.
Note: Any time you convert your form from designer.cs to .ps1, it will overwrite “Form1.ps1” in the destination folder. Be sure to rename your previous file. Since we don’t have too much code to begin with, we’ll move what we have to the new form1.ps1.
Designing the form
I’m going to show an example of a combobox, textbox, masked textbox, and a multi-line textbox. I’m also going to show how to dynamically add content to a textbox.
This is the form for the fields tab:

In this tab, I have the following controls:
- 3 Group Boxes
- GBsettings, GBuserinfo, GBoutput
- 5 Labels
- LBconvention, LBfirstname, LBlastname, LBusername, LBphone
- 1 Combobox
- CMconvention
- 1 Masked Text Box
- MTBphone
- 3 Text Boxes
- TBfirstname, TBlastname, TBusername
- 1 Multi-line Text Box
- TBoutput
- 2 Buttons
- BTreset, BTconfirm
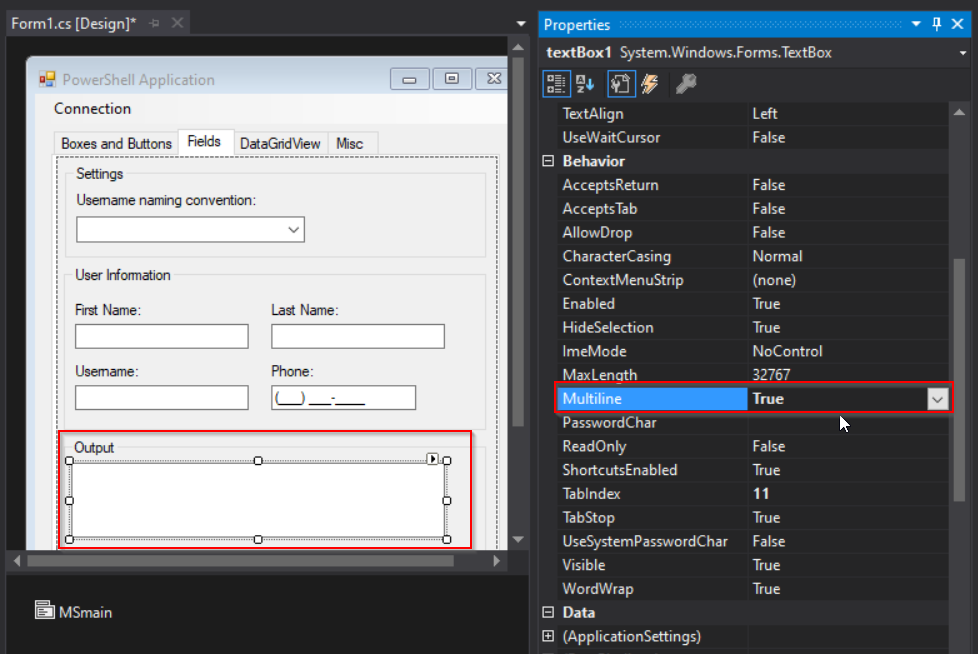
Something to note here- the multi-line text box is just a standard text box with the multi-line parameter set to “True”. You can do this in Visual Studio here:
Comboboxes
Now that we have our form laid out, I’ll explain what the goal is here. We’d like to have a list of naming conventions for the username to auto-generate. The options we will have are:
- First Initial, Last Name
- Full Name
- First Name, last 4 of phone
- None
To begin working with this, we’ll need to add these options to the Combobox. If you haven’t already, convert your design to a .ps1 using Convert-Form. (Don’t forget to rename your old Form1.ps1.)
Below is all that is needed to populate the combobox. I included the combobox code for context.
#
# CMconvention
#
$CMconvention.FormattingEnabled = $true
$CMconvention.Location = New-Object System.Drawing.Point(9, 41)
$CMconvention.Name = "CMconvention"
$CMconvention.Size = New-Object System.Drawing.Size(183, 21)
$CMconvention.TabIndex = 1

# I added this:
$ConventionList = "First Initial, Last Name","Full Name","First Name, last 4 of Phone","None"
$CMconvention.Items.AddRange($ConventionList)
$CMconvention.SelectedItem = "None"

I set the $CMconvention.SelectedItem property to “None”. All this does is select that item when the form loads. If you don’t select anything, it will be blank on startup. If you don’t have a preference for the default item but want it to be populated, I suggest using the first index:
$CMconvention.SelectedIndex = 0
This alone is a powerful tool, since you can use any object as the source. Say if you wanted a combobox filled with all the running services, you could do something like this:
$ComboboxList = (get-service | where status -eq 'Running').name
$CMcombobox.Items.AddRange($ComboboxList)
Dynamically Change Textbox Values
For now, we’re going to stick with the naming conventions. But, as expected, selecting any of these items does nothing at the moment. We’ll need to tell the username text box how to react based on which combobox item is selected. We also want to add this content to the username box as we’re typing. To do this, I’m going to write up a function, which we will use anytime the text is changed in any of the other textboxes.
I like to add my functions near the top of the script, after the initial block of “New-Object” commands. This is my function:
function UpdateUsername {
	if ($CMconvention.SelectedIndex -eq 0){
		$TBusername.Text = ($TBfirstname.Text[0] + $TBlastname.Text).ToLower()
	}
	if ($CMconvention.SelectedIndex -eq 1){
		$TBusername.Text = ($TBfirstname.Text + $TBlastname.Text).ToLower()
	}
	if ($CMconvention.SelectedIndex -eq 2){
		$TBusername.Text = ($TBfirstname.Text + $MTBphone.Text.Split("-")[1]).ToLower()
	}
}
To walk through this function, here’s what happening. We’re using $CMconvention.SelectedIndex, and comparing it to a number. Rather than comparing the SelectedValue, “First Name, Last Initial”, we’re just specifying the selected index. If the first index (0) is selected, we know the “First Name, Last Initial” option is in that spot. Each option has it’s own way of generating the username. For “First Initial Last Name”, we take what’s in the First Name text box, grab the first character, and add that to the text in the Last Name field. “Full Name” just combines both First and Last name fields. “First Name, Last 4 Phone” splits the phone number at the dash (“-“) and uses the second half. I used this as an example of how the text value in the masked text box works. The text value includes the characters in the outline mask. You’ll also notice all the expressions are wrapped in brackets, with .ToLower() at the end. This just makes the username all lowercase. Also, we didn’t need to write anything for “None”.
To put this function to work, we’re going to call it anytime something that could affect it changes. We’ll have to do this in a few different spots, but to keep it simple, here’s everything that I’ve added:
# Update the Username field if the selected Index gets changed.
$CMconvention.Add_SelectedIndexChanged({
    UpdateUsername
})

# Update the Username field if the text in "First Name" changes.
$TBfirstname.Add_TextChanged({
	UpdateUsername
})

# Update the Username field if the text in "Last Name" changes.
$TBlastname.Add_TextChanged({
	UpdateUsername
})

# Update the Username field if the text in "Phone" changes.
$MTBphone.Add_TextChanged({
    UpdateUsername
})
Now if we run the script, we can see our changes in action.


More Buttons
The last thing to do on this page is add functionality to the OK and Reset buttons at the bottom. This is pretty simple, as all we need to do is update the text in $TBoutput.
Here’s what I did to update the information:
#
# BTconfirm
#
$BTconfirm.Location = New-Object System.Drawing.Point(277, 353)
$BTconfirm.Name = "BTconfirm"
$BTconfirm.Size = New-Object System.Drawing.Size(70, 31)
$BTconfirm.TabIndex = 11
$BTconfirm.Text = "OK"
$BTconfirm.UseVisualStyleBackColor = $true

# I added this:
$BTconfirm.Add_Click({
    $TBoutput.Text = "First Name: $($TBfirstname.text)
Last Name: $($TBlastname.text)
Username: $($TBusername.text)
Phone: $($MTBPhone.text)"
})
Note: Notice how the variables are used above. Since the output is just text, we want to specify that the whole $TBtextbox.Text is to be used as the variable. To do that, we wrap it in $() to avoid unwanted output.
Now the Reset button will clear all fields. Here’s how I did that:
#
# BTreset
#
$BTreset.Location = New-Object System.Drawing.Point(201, 353)
$BTreset.Name = "BTreset"
$BTreset.Size = New-Object System.Drawing.Size(70, 31)
$BTreset.TabIndex = 12
$BTreset.Text = "Reset"
$BTreset.UseVisualStyleBackColor = $true

#I added this:
$BTreset.Add_Click({
    $TBfirstname.text = $null
    $TBlastname.text = $null
    $TBusername.text = $null
    $MTBPhone.text = $null
    $TBoutput.text = $null
})
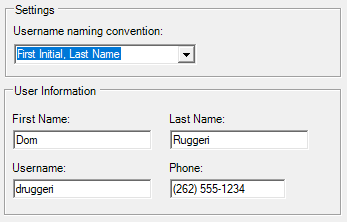
There we go, our Fields tab should now be complete. This is what the end result looked like:

Working with DataGridView
DataGridView is a great way to display retrieved data, and can be one of the more compelling reasons to develop a GUI instead of a standard script. But, tweaking them to work exactly as expected can be difficult, and is something I’ve put a lot of time into.
As always, let’s begin with designing our DataGridView in Visual Studio, and convert it to a .ps1 script file. (Remember to rename or move your previous Form1.ps1 file!)
Here’s what my DataGridView tab looks like:

List of controls on this tab:
- 2 Group Boxes
- GBservices, GBdata
- 2 DataGridViews
- DGVservices, DGVdata
- 4 Labels
- LBstatus, LBcount, LBcolumn1, LBcolumn2
- 1 combobox
- CMstatus
- 3 Textboxes
- TBcount, TBcolumn1, TBcolumn2
- 3 Buttons
- BTgetservice, BTadd, BTremove
The objective is to populate the fields in a DataGridView with the output from a command, and with user input. We’ll cover adding and removing rows, and using the Double Click function. There is also a fair bit of formatting we’ll need to do out of the gate. That’s what we’ll focus on first.
We’ll begin with setting the rows:
#
# DGVservices
#
$DGVservices.ColumnHeadersHeightSizeMode = [System.Windows.Forms.DataGridViewColumnHeadersHeightSizeMode]::AutoSize
$DGVservices.Location = New-Object System.Drawing.Point(6, 19)
$DGVservices.Name = "DGVservices"
$DGVservices.Size = New-Object System.Drawing.Size(329, 111)
$DGVservices.TabIndex = 0

# I added this:
$DGVservices.ColumnCount = 3
$DGVservices.ColumnHeadersVisible = $true
$DGVservices.Columns[0].Name = "Status"
$DGVservices.Columns[1].Name = "Name"
$DGVservices.Columns[2].Name = "Display Name"
This has added our column headers, but if we were to run our script without configuring the rest of the DataGridView properties, they will appear like this:

By default, the DataGridView table is editable by the user, there are row headers, there’s a blank row after every entry- it’s a mess. Here’s what I add to almost all my DataGridViews, and tweak afterwards if needed:
$DGVservices.RowHeadersVisible = $false
$DGVservices.AutoSizeColumnsMode = 'Fill'
$DGVservices.AllowUserToResizeRows = $false
$DGVservices.selectionmode = 'FullRowSelect'
$DGVservices.MultiSelect = $false
$DGVservices.AllowUserToAddRows = $false
$DGVservices.ReadOnly = $true
To explain quickly what these do, (1) disabling the row header removes that first column with the asterisk. (2) AutoSize Columns set to ‘fill’ will do just that. (3) I don’t usually want users changing the row height, but that’s up to you. (4) If “FullRowSelect” is not the selection type, clicking on an item will highlight a single cell. This highlights the whole row. (5) MultiSelect allows you to ctrl+click as many rows as you need- we’ll set this one to false. (6,7) And lastly, we don’t want the users editing or adding to the DGV directly.

Populate DataGridView with command Output
Now that our DataGridView is looking better- let’s get some data in it. If you couldn’t already tell, I’m going to use the Get-Service command to populate the DGV. Lets jump down to just below the DGV and set up our command.
To keep it simple, we’ll have the “Status” combo box have 3 options, Running, Stopped, and All. Item Count is going to be how many items we want to return. Lastly, the “Get Service” button will run our command.
Here’s how I set that up:
#
# CMstatus
#
$CMstatus.FormattingEnabled = $true
$CMstatus.Location = New-Object System.Drawing.Point(47, 134)
$CMstatus.Name = "CMstatus"
$CMstatus.Size = New-Object System.Drawing.Size(103, 21)
$CMstatus.TabIndex = 1

# I added this:
$StatusList = "All","Running","Stopped"
$CMstatus.Items.AddRange($StatusList)
$CMstatus.SelectedIndex = 0
The code above adds the options to the combobox, and selects the first index item as default.
Now we get into some real scripting. The rest of the action will happen when we click the “Get Service” button. We’re going to create another function for this. Here’s what I’ve added:
function UpdateServices {
	$DGVservices.Rows.Clear()
	if ($TBcount.Text -gt 0){
		$CountParam = @{
			'first' = $TBcount.Text
		}
	}
	else {
		$CountParam = @{}
	}
	if ($CMstatus.SelectedIndex -ne 0){
		$Services = Get-Service | where status -eq $CMstatus.SelectedItem | select @CountParam
	}
	else {
		$Services = Get-Service | select @CountParam
	}

	foreach ($Service in $Services){[void]$DGVservices.Rows.Add(($Service).Status,($Service).Name,($Service).DisplayName)}
}
What this does is clears the existing rows in the DGV first. It then says, “If a count is specified, create a hash table to select the first of that many items.” Then, if the combobox is anything but “All” is uses the value of the selected combobox in a ‘where status -eq’ statement. Then, we add the Status, Name, and Display name for each item in each row. The [void] type is here because it will output the results to the prompt if it’s not. Now we jump down to our $BTgetservice, and add this function on a click.
#
# BTgetservice
#
$BTgetservice.Location = New-Object System.Drawing.Point(255, 133)
$BTgetservice.Name = "BTgetservice"
$BTgetservice.Size = New-Object System.Drawing.Size(80, 23)
$BTgetservice.TabIndex = 2
$BTgetservice.Text = "Get Service"
$BTgetservice.UseVisualStyleBackColor = $true

# I added this:
$BTgetservice.Add_Click({
	UpdateServices
})
Let’s run it, and see how it looks.


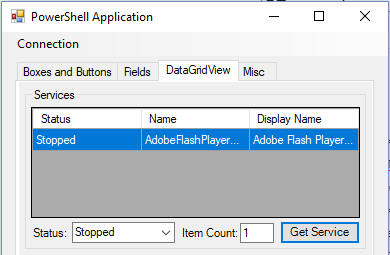
To make this a little nicer, let’s get rid of some of that extra space on the status. I added this to the $DGVservices properties:
$DGVservices.Columns[0].Width = 60
Note: This must be placed after the “$DGVservices.AutoSizeColumnsMode = ‘Fill’” line, otherwise the change will be overwritten. Now it’s looking even better:

With this under our belts, adding data from a user input should be simple.
Populating DataGridView with field inputs
First on our list is to pretty-up our DataGridView. No re-work required- let’s copy the properties from our other DGV.
#
# DGVdata
#
$DGVdata.ColumnHeadersHeightSizeMode = [System.Windows.Forms.DataGridViewColumnHeadersHeightSizeMode]::AutoSize
$DGVdata.Location = New-Object System.Drawing.Point(6, 19)
$DGVdata.Name = "DGVdata"
$DGVdata.Size = New-Object System.Drawing.Size(329, 144)
$DGVdata.TabIndex = 4

# I added this:
$DGVdata.ColumnCount = 3
$DGVdata.ColumnHeadersVisible = $true
$DGVdata.Columns[0].Name = "Property 1"
$DGVdata.Columns[1].Name = "Property 2"
$DGVdata.Columns[2].Name = "Username"
$DGVdata.RowHeadersVisible = $false
$DGVdata.AutoSizeColumnsMode = 'Fill'
$DGVdata.AllowUserToResizeRows = $false
$DGVdata.selectionmode = 'FullRowSelect'
$DGVdata.MultiSelect = $True # I set this to True this time
$DGVdata.AllowUserToAddRows = $false
$DGVdata.ReadOnly = $true
I like to keep streamlined processes out of the direct actions, so we’re going to set up two new functions. The first will add the content from the Column 1 and 2 field, then put our Username in the 3rd column. The other function will remove the selected rows. Here’s the add data function:
function AddData {
	if (($TBcolumn1.Text -gt 0) -and ($TBcolumn2.Text -gt 0)){
		[void]$DGVdata.Rows.Add($TBcolumn1.text,$TBcolumn2.text,$env:USERNAME)
	}
}
This just says “If both fields have text, add the two fields and the username.” Let’s create the remove function right away.
Function RemoveData {
	$DGVdata.SelectedRows | foreach {$DGVdata.Rows.Remove($_)}
}
That was an easy one. Let’s add those functions to the click action for the buttons.
$BTadd.Add_Click({
	AddData
})

$BTremove.Add_Click({
	RemoveData
})
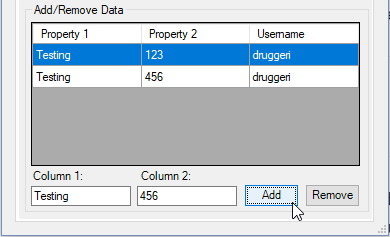
Now we’ll make sure it works.
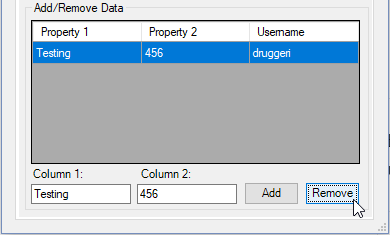
You may have wondered why we needed to make something as simple as that remove command into a function. That’s because we don’t do anything around here twice.
Adding Double Click to DataGridView
Let’s say we want to remove an item by double clicking it. Since we made the RemoveData function, it’s pretty simple- but it’s a little different than the normal Add_Click. I added this beneath our $DGVdata properties:
$DGVdata_OnDoubleClick = {
	RemoveData
}
$DGVdata.add_doubleclick($DGVdata_OnDoubleClick) # This adds the double click control.
Now we can double click to remove an item. Think of other functions you may want to happen with double clicking data. For fun, let’s add a function that restarts the selected service on double click in the first DGV.
# Create the function
function RestartSelectedService {
	Restart-Service $DGVservices.SelectedCells[1].Value
}

# Add the double click functionality
$DGVservices.add_doubleclick($DGVservices_OnDoubleClick)

# Run the function on double click
$DGVservices_OnDoubleClick = {
	RestartSelectedService
}
There’s a good bit of information in that last command. The $DGVservices.SelectedCells[1].Value means we are taking the value of the selected cells, in the second index position (0, 1, 2), which is our service name. Use this to run commands based on the data pulled from your DataGridViews.
Here’s what my DataGridView Tab looks like completed:

Conclusion
This was a long one. We learned how to enter, use, and manipulate fields, as well as add data, format tables, and manipulate DataGridViews. In the next article I’m going to cover some more obscure controls like Time/Date, Progress Bars, and maybe get into multi-window applications. If there’s something you’d like to know how to do in PowerShell using winforms, leave a comment, or send an email to dom@domruggeri.com.
Thanks for reading!

Any way to add checkboxes to data grid in order to select more than one entry for editing?
LikeLike
Hey NEM, thanks for reading-
Yes, there is. I’ll explain using the Services DataGridView as an example.
There’s a few things that would need to change in the code in this tutorial.
This would need to be added before the column count, “$DGVservices.ColumnCount = 3” :
$CheckColumn = New-Object System.Windows.Forms.DataGridViewCheckBoxColumn
$CheckColumn.Name = “Check”
[void]$DGVservices.columns.Add($CheckColumn)
This creates a checkbox column, and adds it to the DataGridView before the rest of the columns. It names the column header “Check”. The [void] is here, otherwise you see a “0” in the prompt when it’s added.
We also need to update our column count from 3 to 4: “$DGVservices.ColumnCount = 4”
Now that we have that, we need to change part where we populate the data, because the data we are importing will go in the first, second, and third column. We want the check in the first column, then the rest of the data in two, three, and four.
My original function had this in it: foreach ($Service in $Services){[void]$DGVservices.Rows.Add(($Service).Status,($Service).Name,($Service).DisplayName)}
We could set all the checkboxes blank by just adding $False before the $Service.Status.
That would look like this:
foreach ($Service in $Services){[void]$DGVservices.Rows.Add($False,($Service).Status,($Service).Name,($Service).DisplayName)}
Or, we could get creative and say if the service is running, set the checkbox to $true:
foreach ($Service in $Services){[void]$DGVservices.Rows.Add((($Service).Status -eq ‘Running’),($Service).Status,($Service).Name,($Service).DisplayName)}
The problem here is that we set the DataGridView to Read Only. That means you can’t change the state of the checkbox by clicking it. But if we make read only false, they can edit the tables. So we leave the DataGridView ReadOnly True, and create a new function on single click to change the checkbox state. I made this function:
function UpdateCheckBox{
$DGVservices.SelectedRows | foreach {
if ($_.cells[0].value -eq $False){
$_.cells[0].value = $true
}
else{
$_.cells[0].value = $False
}
}
}
Then I used it when the row is single clicked:
$DGVservices.add_click({
UpdateCheckbox
})
This just says if its checked, uncheck it, and vice versa.
I could go into more detail on how to use that checkbox state, but I feel like I’m rambling, so I’ll leave it at this for now.
Hope this helps!
LikeLike
How do you convert this back to a .cs file to ultimately compile? Basically, how do we Convert-Form back into a Designer.cs file?
LikeLike
We don’t! Or at least, I don’t. I either keep these as PowerShell scripts, runnable from the .ps1 file, or I compile them using PS2EXE.
LikeLike
Thank you!
LikeLike
Hello again!
How would you put new lines in Textbox outputs? The current output looks something like: “Administrator user user1 user2”.
I’d like it to be:
“Administrator
User
User1
user2”
ex:
#
# BTNsubmit
#
$BTNsubmit.Location = New-Object System.Drawing.Point(378, 126)
$BTNsubmit.Name = “BTNsubmit”
$BTNsubmit.Size = New-Object System.Drawing.Size(75, 23)
$BTNsubmit.TabIndex = 3
$BTNsubmit.Text = “Submit”
$BTNsubmit.UseVisualStyleBackColor = $true
########## I added this ##########
$BTNsubmit.Add_Click({
$c = get-childitem C:\users
$c = $c.Name
$TBoutput.Text = $c
})
#
#
LikeLike
For multiple lines, the Text box would need to have multiline set to $true. Once you’ve done that, there’s a a few ways you can add multiple lines.
In your example, I think you could separate the users by a space. So you could say anytime there’s a space, create a new line instead:
$c = get-childitem c:\users
$c = ($c.Name).split(” “)
I think that may get you what you’re looking for. If not, you could try:
foreach ($user in $c){
$TBoutput.text += $user`n
}
This would add each user individually, and add a new line after each one.
Hope this helps!
LikeLike
Hey Dom,
What if I wanted to create a Button Column within my DGV? Let’s say, instead of double-clicking to restart the service, there would be a button in the first column set to restart service. I’ve been able to create the button column but I can’t seem to add a click to the button column.
Thanks in advance,
LikeLike
I need help!!! I have powershell scripts 4 in number one is the main script which calls other scripts.
Can you please let me know how to bundle those scripts and make an exe file which will run the main script.Thanks.
LikeLike
I’m working with gridviews and I appreciate your walkthrough so far. I’m pretty new to the GUI so this is helpful.
I’m very familiar with concocting data into PSCustomObjects and then I’ll often write those objects to a database table with the SQL Module. My question is, how do I get at the data in the grid view? I’m building a form that has a technician input data I need to commit to a database I’ve been trying to find an export method of some kind.
Also, what sources do you recommend to learn further about building windows forms specifically with powershell? Is there a book or maybe a class you recommend?
LikeLike
Any place to get a copy of this code?
LikeLike